![]()
![]()
![]()
There are three components to download to get started;
The new few documents will allow you to download and install each component.
|
|
|
|
When you run the desktop app, the first thing to do is create the config file : double click on the app to open the interface in your browser. On the setup screen, you can enter settings for the mobile app, the web interface and the desktop app.
|
|

Mobile app settings
Web UI settings
Desktop app settings
Buttons on this screen
Sound effects
To handle sound effects with the desktop app : first gather all your sound effect files together in a folder, then drag the folder on top of the desktop app. A confirmation dialog should pop up to let you know that the sounds were imported successfully. To add more effects, just add more files to the folder then drag the folder onto the app again.
Running the app on Linux
For Linux, download the UPDeck_xxx.love file (top of page), install Löve then run UP Deck with the following command;
love UPDeck_xxx.love
Download the Lua script UPDeck_2-1-19.lua and then load it into OBS from the following menu : OBS -> Tools -> Scripts
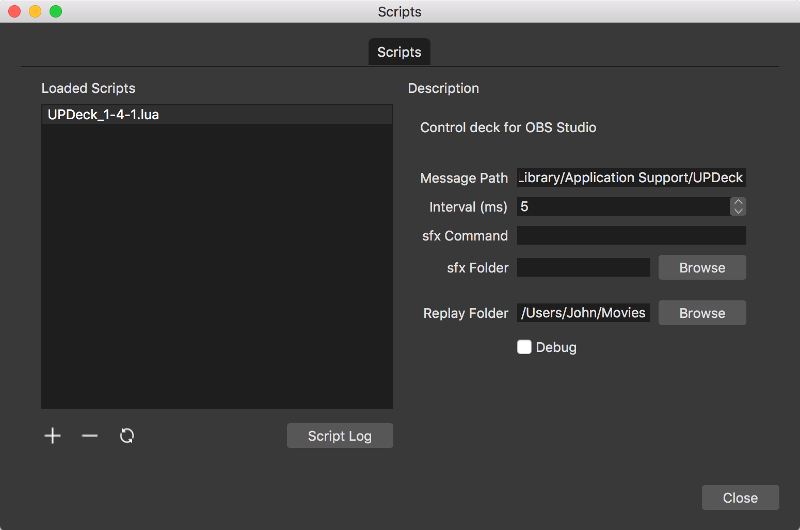
Use the '+' icon to browse for the saved script and load it.
The following script fields can then be configured...
If you have opted to let the desktop app handle sound effects, you can leave the sfx Command and sfx Folder fields blank.
For playing sound effects, there are multiple programs available that can play sound files from the command line. Macs come with afplay installed and mpg123 is another well known project - available for Mac / Windows / Linux.
|
|
|
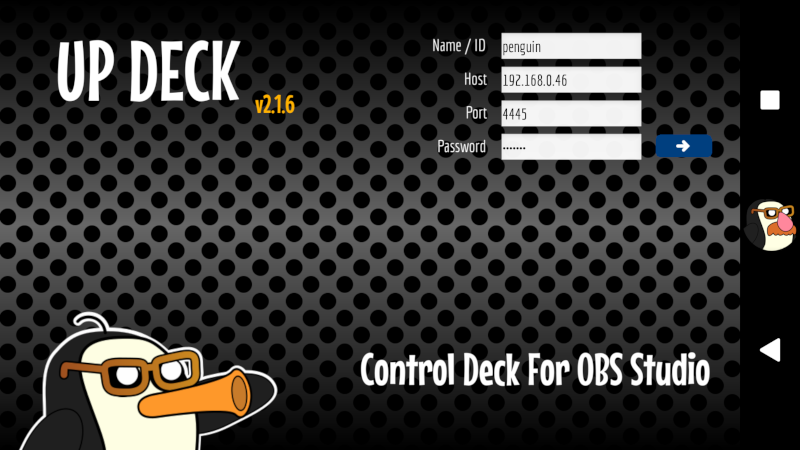
You can also download the android .apk file here
After launching the app on your device, enter a name to identify your device into the Name / ID text box. This name will identify which device is to be updated when you edit buttons using the browser UI. Next, enter the IP address of the machine running OBS into the Host text box. The Port and Password inputs are the values that you set up in the desktop app previously. After entering the required info, press the blue button to continue...
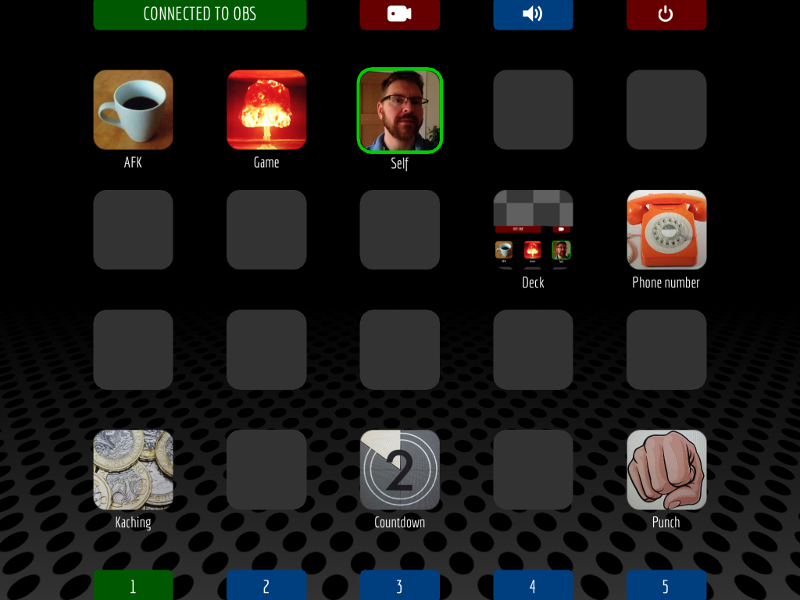
The next screen is the main interface and it's from here that you connect to the desktop app. The button at the top left of the screen shows the current status - OFFLINE. When you tap this button, it turns amber as the app attempts to connect and then green, showing a connected status. If connection fails, double check the host address is correct, and that the port number and password match those set up in the desktop app. The red button at the top right returns you to the previous screen.
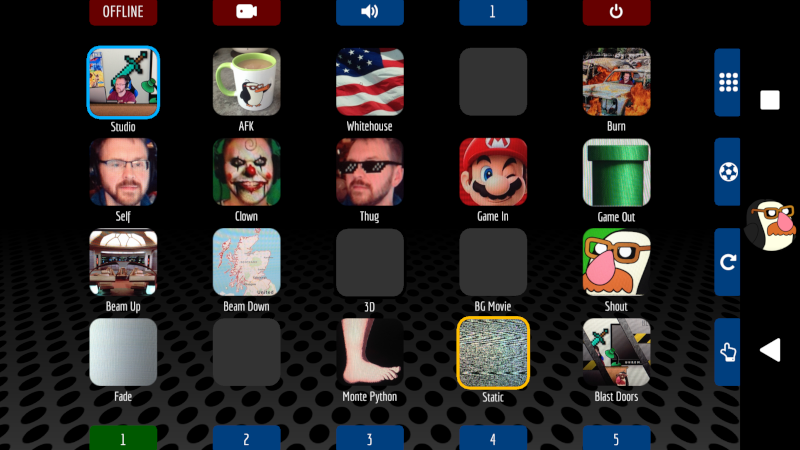
The deck has 25 banks of 20 buttons. The screen can be swiped left and right or you can use the 5 bank (page) buttons at the bottom of the screen to quickly jump to banks 1 - 5.
Banks 6 - 25 can be accessed quickly by pressing the 4th button along the top of the screen (it displays the currently selected bank). A panel will appear with buttons to access all the remaining banks.
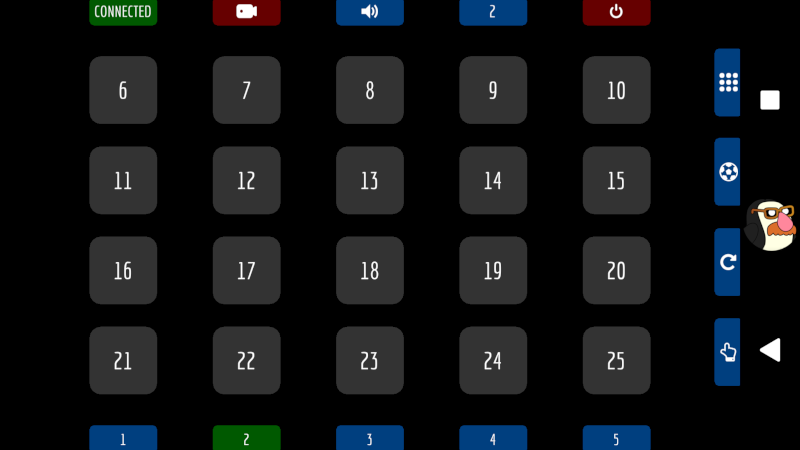
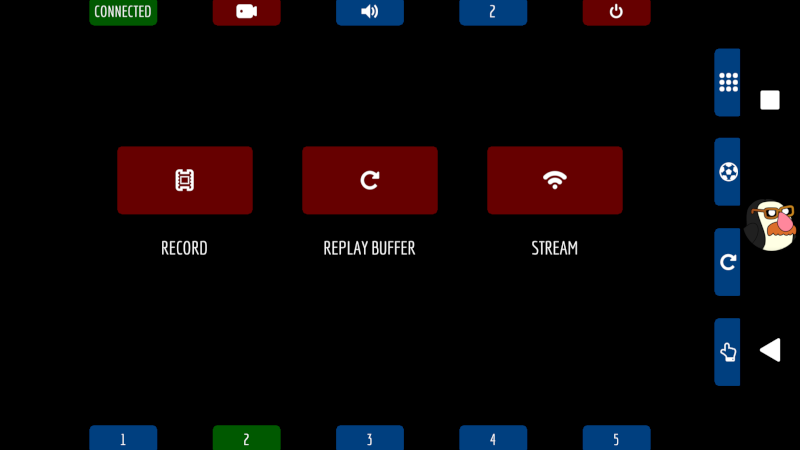
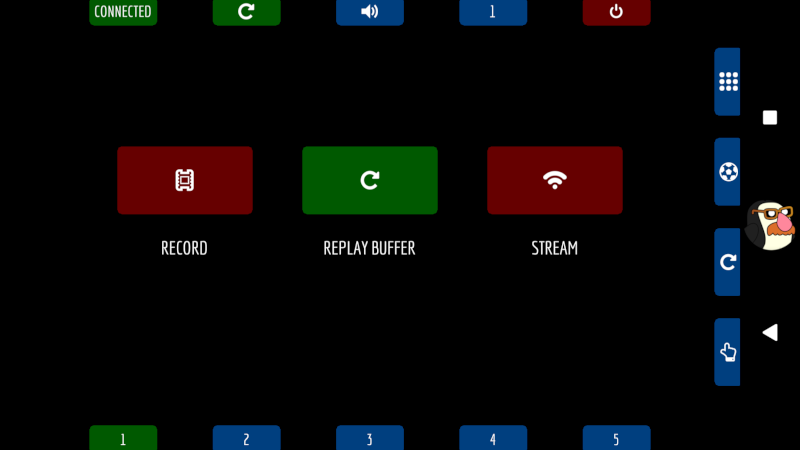
The second button along the top of the screen shows and hides the control panel to start and stop recording, replay buffer (for action replays) and streaming.
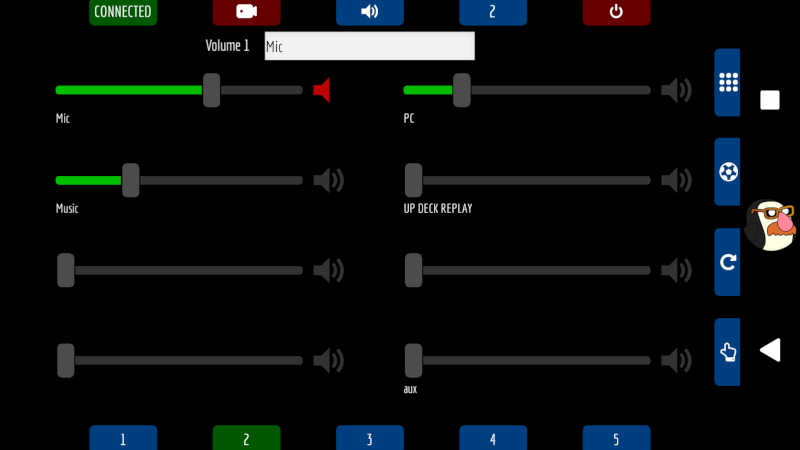
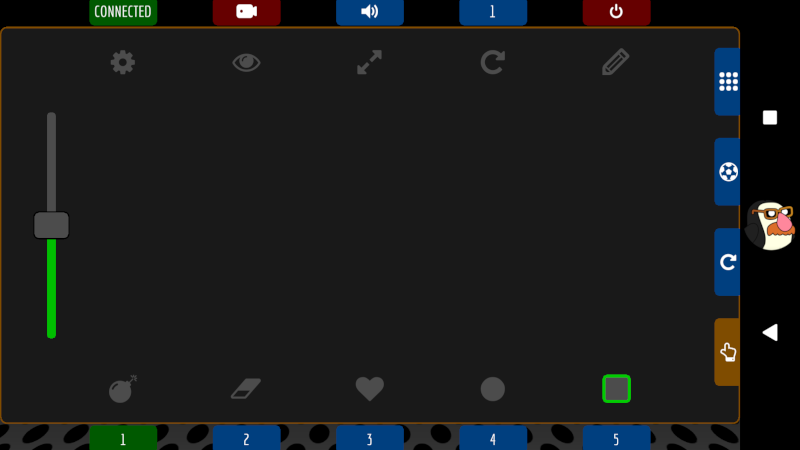
The third button along the top of the screen shows and hides the panel to control volume and muting. To configure a volume control, press and hold its mute icon until a text box appears at the top of the screen. Type the name of the audio source into the box - exactly as it appears in OBS (case sensitive). Once complete, sliding the volume control up and down should change that audio source's volume in OBS.
The buttons down the right edge will be covered later - they are;
Using the desktop browser UI
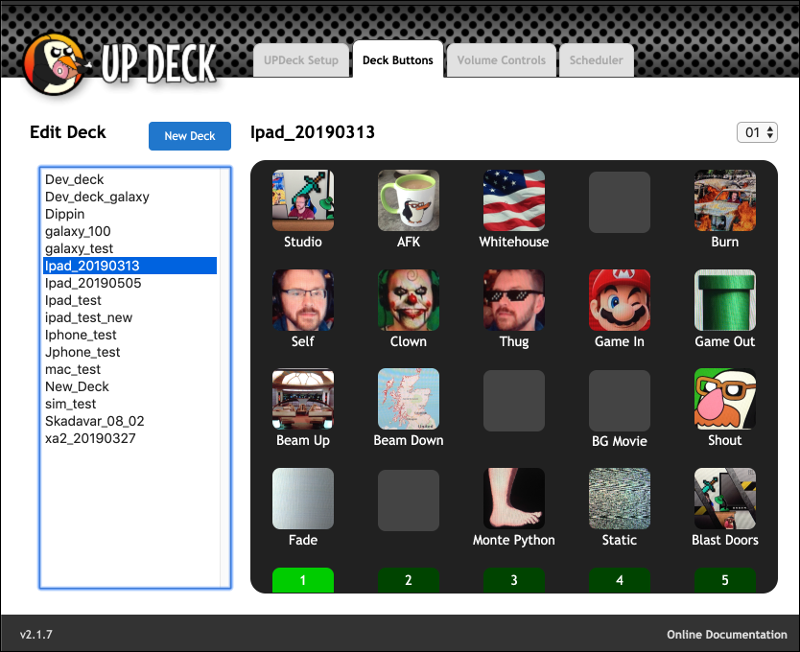
To open the browser UI, double click on the desktop app - the interface should then open in your default browser. Using the 'Deck Buttons' tab, you can either select an existing deck from the list at the left side of the page, or use the 'New Deck' button to create a new deck. Once a deck has been selected, it should be displayed on screen - you can now click on any of the buttons to edit.
When editing buttons, you can save all your edits to the deck you are working on, then restore the deck on the device, or you can push each edit individually to the device - more details below...
If you have a deck on your device that you want to edit, then create a backup of it to the desktop - the deck will then appear in the list.
For more info on backup and restore : Backup_and_Restore.
On the button edit page, you have everything you need to quickly set up your button;

The format when typing in button commands is;
|
Description Command Parameter Parameter Parameter...
Next Description Next Command Next set of parameters |
Using the mobile device
When setting up button actions, the app goes OFFLINE, so remember to reconnect again when finished by pressing the top left button on the main screen. As an example, we will program a button to switch to a scene named 'Game' using the 'Fade' transition. Pick any deck button then press and hold until the button setup screen appears.
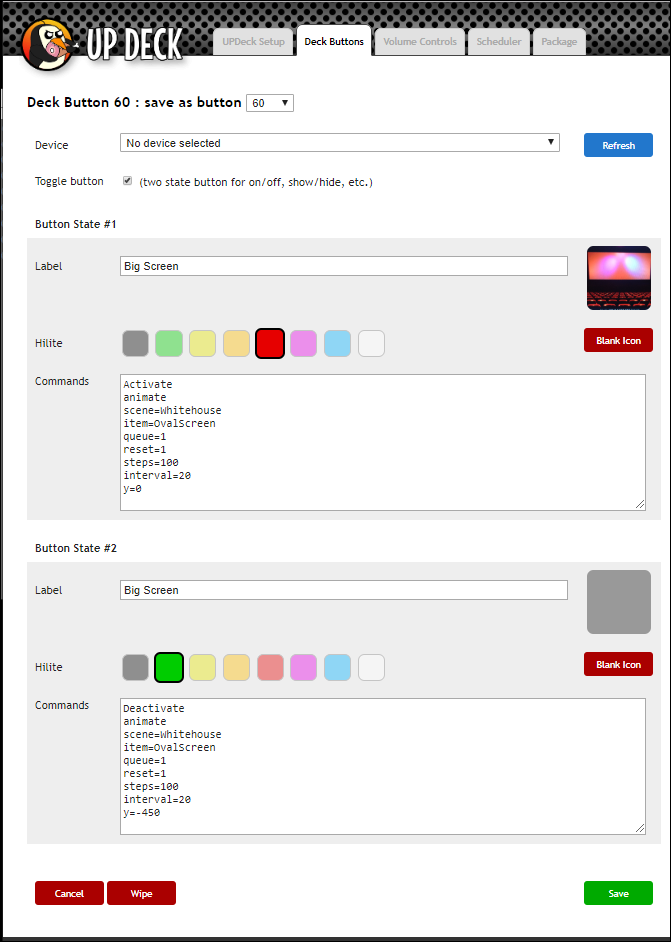
Enter the button label - this will be displayed under the button on the main screen. If you enter a button group then this button will become a member of that group. When a grouped button is pressed, it is hilited with the color selected. Only one button in a group can show it's hilite color, so you can always tell which button in the group was pressed last. You can add multiple commands (actions) to a button by separating each one with a blank line.
To save your changes, press the green save button Remember to connect to OBS again before testing your new button functionality.
If editing buttons on the desktop, you simply click the icon, select an image, resize and crop. The following is how you add an icon using the mobile app.
Pick a deck button then press and hold until the button setup screen appears. Tap the blank icon image (or the existing icon if you are changing it) at the right side of the screen and the icon setup screen will appear.
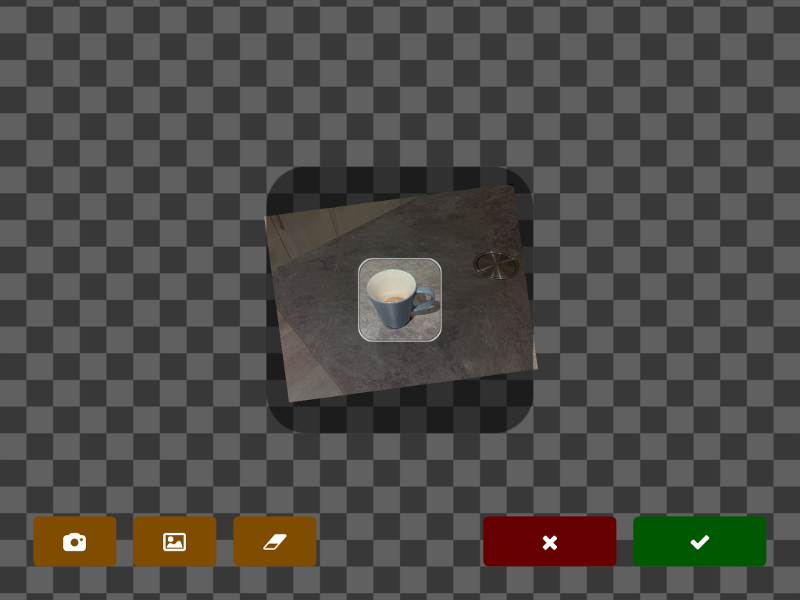
The amber buttons at the bottom of the screen allow you to take a picture with the device camera, select an image from the photo library or clear the image you are currently working with. Once you have an image on screen, you can pinch zoom and rotate it until the icon viewfinder contains the image section to use on the button. Another easy way to source images for creating icons is to search the web on your PC, find an image you like, then take a picture of the PC screen. Press the green save button to assign the icon to the button.
When the group field is populated in the button setup screen (see assigning actions to buttons), the button becomes a member of that group. In the example below, the three buttons on the top row are members of the 'scenes' group. When one of these buttons is pressed, it is hilited in its selected hilite color. If either of the other buttons was previously hilited, it returns to its normal state. Only one button in a group can show it's hilite color, so you can tell which button in the group was pressed last.
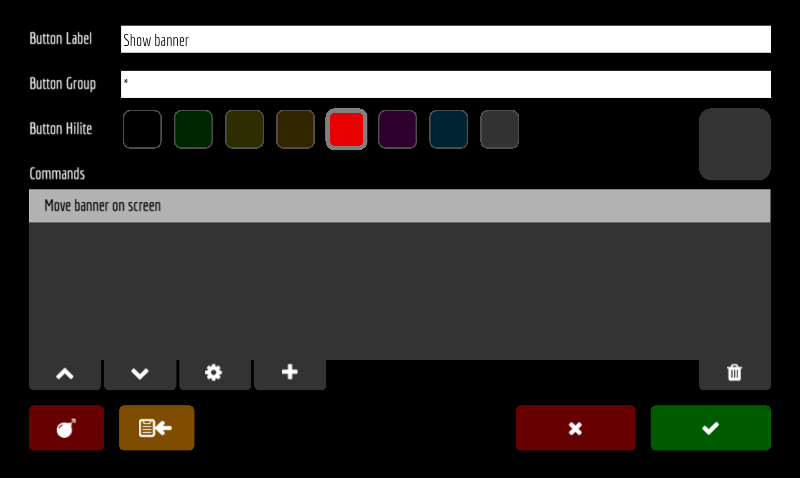
You can create toggle buttons to give on/off functionality by using the special group * (asterisk) when configuring the button. When editing on desktop, selecting a button to be a toggle button automatically assigns the special group. When editing on mobile, you must assign the group manually by entering * in the group text box. Once set, the button has two states and pressing it toggles between them. To configure each state, simply press the button until it is in the state you wish to configure, then press and hold until the button setup screen appears. Each state has it's own unique configuration, including hilite color and icon.
Familiarize yourself with adding actions to buttons.
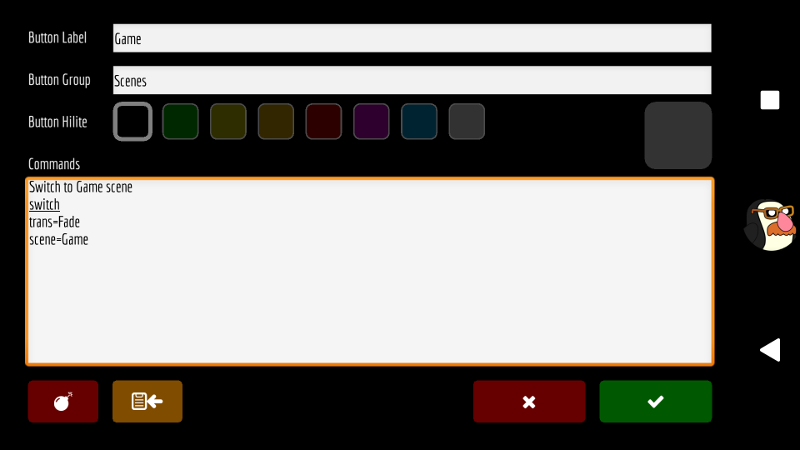
The command to switch to another scene is switch
The parameters are;
The transition parameter is optional - if omitted, the current transition is used.
The optional delay specifies a time (in milliseconds) to wait before running the command.
Example
|
Switch to Game scene switch trans=Fade scene=Game |
Familiarize yourself with adding actions to buttons.
The command to change object visibility is show
The parameters are;
The val parameter can be one of : 0 (hidden), 1 (visible) or * (toggle current visibility)
The scene parameter is case sensistive, so must be exactly as it appears in OBS.
The group parameter must be used if the scene item is in a group (available from OBS Studio v22).
The optional delay specifies a time (in milliseconds) to wait before running the command.
You can add as many scene item parameters as required.
Example - toggles the visibility of two objects: News flash and Phone banner
|
Toggle visibility of objects show val=* scene=Game News flash Phone banner |
If you are going to resize items in your scene, then it's important to set a bounding box type for those items. UP Deck sets the size of the bounding box when you change the width and height of an item.
To set a scene item's bounding box type;
You should now have the edit transform box on screen and be able to select a bounding box type. (I usually use Scale To Outer Bounds, but select each one in turn and then resize the item manually on screen to see what the differences are)
The following doc has a video attached with an example : animating a camera object - step by step.
![]()
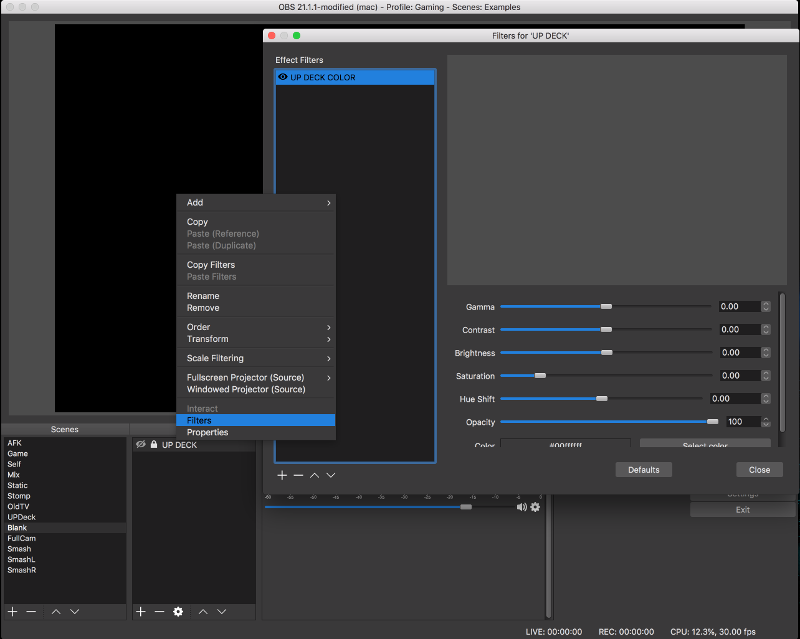
If you are setting the opacity of any objects then you must create a special object called UP DECK. It can be any type of object - a Color Source for example. It can also be created in any scene - as long as it exists somewhere in OBS - it can even be invisible. You then must add a Color Correction filter to this special object : rename the filter to UP DECK COLOR. After this special object and filter have been created, you can set the opacity of any object in any scene using the position and animate commands.
To add the Color Correction filter to an object;
Familiarize yourself with adding actions to buttons.
The command to position / resize / rotate objects is position (resize, rotate and opacity are aliases)
The parameters are;
The scene and item parameters are case sensistive, so must be typed exactly as they appear in OBS.
The group parameter must be used if the scene item is in a group (available from OBS Studio v22).
The optional delay specifies a time (in milliseconds) to wait before running the command.
The four crop parameters (cl, cr, ct, cb) allow you to crop the scene item from the left, right, top and bottom.
Setting Opacity : If you are setting the opacity of any objects then you must create a special object called UP DECK. It can be any type of object - a Color Source for example. It can also be created in any scene - as long as it exists somewhere in OBS - it can even be invisible. You then must add a Color Correction filter to this special object : rename the filter to UP DECK COLOR. After this special object and filter have been created, you can set the opacity of any object in any scene.
x and y position : the top left corner of the screen is 0,0. If you're broadcasting in 720p then the bottom right of the screen is 1279,719 (screen size of 1280x720).
If you only want to resize an object, you can supply the w and h parameters and omit the x, y and r parameters. (And use the resize alias to make things easier to understand). The same is true for positioning and rotating.
Example
|
Set the space ship position and rotation position scene=Space item=Ship x=700 y=400 r=45 |
Familiarize yourself with adding actions to buttons.
The command to animate objects is animate (the move command is an alias of animate)
The parameters are;
The scene and item parameters are case sensistive, so must be typed exactly as they appear in OBS.
The group parameter must be used if the scene item is in a group (available from OBS Studio v22).
The optional delay specifies a time (in milliseconds) to wait before running the command.
The four crop parameters (cl, cr, ct, cb) allow you to crop the scene item from the left, right, top and bottom.
Setting Opacity : If you are setting the opacity of any objects then you must create a special object called UP DECK. It can be any type of object - a Color Source for example. It can also be created in any scene - as long as it exists somewhere in OBS - it can even be invisible. You then must add a Color Correction filter to this special object : rename the filter to UP DECK COLOR. After this special object and filter have been created, you can set the opacity of any object in any scene.
x and y position : the top left corner of the screen is 0,0. If you're broadcasting in 720p then the bottom right of the screen is 1279,719 (screen size of 1280x720).
If you only want to move an object, you can omit the w, h and r parameters - the same is true if you only want to resize or scale : just leave out the parameters you don't want to change.
By adjusting the steps and interval values, you can control the speed of the animation and how smooth it looks - experiment to find your preferred values.
The optional easing parameter adds an easing effect to the animation. Valid values are EaseOut, EaseIn, EaseOutIn, EaseInOut and EaseOutElastic. If no easing is specified (or an invalid value is used) then no easing is applied. Check out the examples below : one moves an object on to the screen and the other moves it off screen. When moving the object on to the screen, EaseOut has been used so that the object starts quickly, then decelerates as it reaches the target position. When moving the object off screen, EaseIn has been applied to start the animation slowly and then accelerate off screen.
Example
|
Move on screen animate item=Penguin Coffee x=180 y=500 steps=20 interval=10 easing=EaseOut |
Example
|
Move off screen animate item=Penguin Coffee x=180 y=721 steps=20 interval=10 easing=EaseIn |
This is an extension to Animating_objects : moving_resizing_rotating, so check out that page first! From version 2.0.3 of the Lua script, filters properties can be animated, which opens up some new and interesting possibilites. The video example uses the excellent stream effects plugin.
First problem - you add a filter to an object, but how do you find out the names of its properties? Maybe there's already an easy way that I don't know about - if there is, let me know! The following command will pop up a list of filter properties on your device;
command : filterprops
parameters;
Example
|
Show 3d filter props filterprops source=TV filter=3d |
Now that you have a list of the property names, you can start adding them to your animate and position commands. You can add up to 5 filters to your animations by adding extra parameters (filter names and parameter names are always case sensitive!);
All the usual variable substitution and relative value options should work as normal. Note the use of the colons to separate each part of the filter property data.
For the demonstration in the video, the properties of the transform filter that I animated were Filter.Transform.Rotation.Y and Filter.Transform.Scale.X
Command
|
Animate TV object animate scene=_current item=TVGroup steps=20 interval=20 easing=easeout filter1=3d f1:Filter.Transform.Rotation.Y:20 f1:Filter.Transform.Scale.X:80 |
I used the same command to restore the TV by setting Filter.Transform.Rotation.Y back to 0 and Filter.Transform.Scale.X back to 100.
All of the above can also be used with the position command to directly set filter properties without any animation.
If you've been using the position or animate commands to manipulate objects on screen, then things just got even easier!
Instead of setting the x and y co-ordinates, width and height, rotation and cropping of an object;
you can now use;
This will morph the object that you are manipulating to the position, size, rotation and cropping of the morph object (which can be on another scene). You can create template objects in OBS and then use them to guide your camera, etc. around the screen. Easy to set up, easy to edit and easy to program in the deck!
example
|
Move camera to corner of screen animate scene=_current item=camera morphScene=camPositions morph=cornerLeft steps=20 interval=10 easing=easeout |
* Remember to set the bounding box type of template objects that you are going to use with morph!
From version 1.8 of the OBS Lua script, you can now use relative values for the x and y co-ordinates, width and height, and rotation of objects using the position and animate commands.
places the object at 100 pixels from the left edge of the screen and 300 pixels down from the top.
Positioning an object with relative values;
places the object 50 pixels to the right and 80 pixels up from its current position.
Just enclose values with brackets to indicate that they are relative. You can also mix absolute and relative values;
places the object 100 pixels to the left of its current position and 250 pixels down from the top of the screen.
For width, height and rotation, just specify the w, h and r values in the same way as above.
Added in v1.9 of the obs lua script : If you want to run multiple animations on an object, but perform them one at a time, then you can activate the animation queue for the object. To do this, add the following parameter into the first of the animate commands;
Once the queue is active for the object, animations run in sequence. To de-activate the queue, just set the value to 0;
Whether the queue is active or not, you may want to cancel any existing animations that are currently running on the object before you start something new. You can do this by adding the following parameter to your animate command;
Note : if the queue is inactive and an animation is in progress, activating the queue will cancel the existing animation.
The animate command (before v1.9) needed at least one of the x,y,w,h or r parameters to be accepted, but now you can also just specify the queue or reset parameter. You can use commands like...
animate
animate
Familiarize yourself with adding actions to buttons.
The command to change the order (layer) of a scene item is order
The parameters are;
The group parameter must be used if the scene item is in a group (available from OBS Studio v22).
The optional delay specifies a time (in milliseconds) to wait before running the command.
example
|
Move the balloon behind everything else order scene=party item=balloon 0 |
* If the scene item is in a group then this command only alters the layering of the objects inside the group.
Example: Game video full screen and camera in bottom corner. If you switch these items - expand the camera to full screen and shrink the game video to bottom corner, then the camera will completely cover the screen and you won't be able to see the game video as it's still behind the camera view. In this case, we can switch the order of the scene items (like layers in the Gimp or Photoshop). At some point, as the camera is expanding from the bottom corner, we switch it's layer position so that it appears behind the game view. When the transition is complete, the game view is now sitting in front of the camera, so is visible. If we switch back again, we do the same thing : which ever view expands to be full screen must be moved behind the other view. In my setup, I had a background image which appeared behind both camera and game - this background image is layer 0. The view to be expanded to full screen is set to layer 1 - which puts it behind everything else, apart from the background image.
Example : wait until the transition is in progress, then switch the OldTV scene item to layer 1.
|
Relayer TV object order delay=75 scene=studio item=OldTV 1 |
Familiarize yourself with adding actions to buttons.
You can start and stop other apps - an example is Pretzel for playing background music.
The command to start an app is launch
The command to stop an app is kill
The optional delay parameter is also available for these two commands - it specifies a time (in milliseconds) to wait before running the command.
Windows Examples
|
Launch music app
launch
app=C:\Users\judas\AppData\Local\Programs\PretzelDesktop\Pretzel.exe
|
|
Kill music app
kill
app=Pretzel.exe
|
Mac Examples
|
Launch music app
launch
app=Pretzel
|
|
Kill music app
kill
app=Pretzel
|
Familiarize yourself with adding actions to buttons.
The command to open a web page (URL) in your browser (or to open it in the background) is openurl
The parameters are;
The optional bg parameter opens the url in the background - nothing shows on screen.
The optional delay specifies a time (in milliseconds) to wait before running the command.
Example - open the UP Deck documentation in your browser.
|
Open the UP Deck docs openurl url=https://8up.uk/docs |
Example - silently trigger an action on a remote site.
|
Remote trigger openurl url=https://www.SomeWebSite.com/trigger/go
bg=true
|
Familiarize yourself with adding actions to buttons.
The command to play a sound effect is play
The optional delay parameter is also available - it specifies a time (in milliseconds) to wait before running the command.
Example
|
Punch sound effect play Punch.mp3 |
Handling sound effects with the desktop app
If you use this option then simply drag the folder containing your sound effects on to the desktop app. This will import the sound effects and make them available to play - a dialog box should appear to let you know if the action was successful. To add more effects, just add them to the same folder then drag over the desktop app again.
New in v2.1.7 of the desktop app : stop a sound effect while it is playing with the sfxstop command ...
|
Stop playing Beethoven sfxstop Beethoven.mp3 |
Familiarize yourself with adding actions to buttons.
The command to change the volume level of one or more audio sources is vol
The parameters are;
The optional delay specifies a time (in milliseconds) to wait before running the command.
Example - change the volume of the Aquarium and Music audio sources to 0.9
|
Adjust source volumes vol val=0.9 Aquarium Music |
The command to fade the volume level of one or more audio sources is fade
The parameters are;
For more info on the optional trigger, see Countdown timers
The optional delay specifies a time (in milliseconds) to wait before running the command.
Example - fade the volume of the Mic and Music audio sources from their current levels to 0. The fade effect is split into 100 steps with a 50ms interval between each step.
|
Fade Mic and Music sources fade volume=0 steps=100 interval=50 Mic Music |
Familiarize yourself with adding actions to buttons.
The command to mute / unmute one or more audio sources is mute
The parameters are;
The val parameter can be 0 (unmute), 1 (mute) or * (toggle current setting).
The optional delay specifies a time (in milliseconds) to wait before running the command.
Example - toggle the current mute state of the Aquarium and Music audio sources
|
Toggle Aquarium and Music mute mute val=* Aquarium Music |
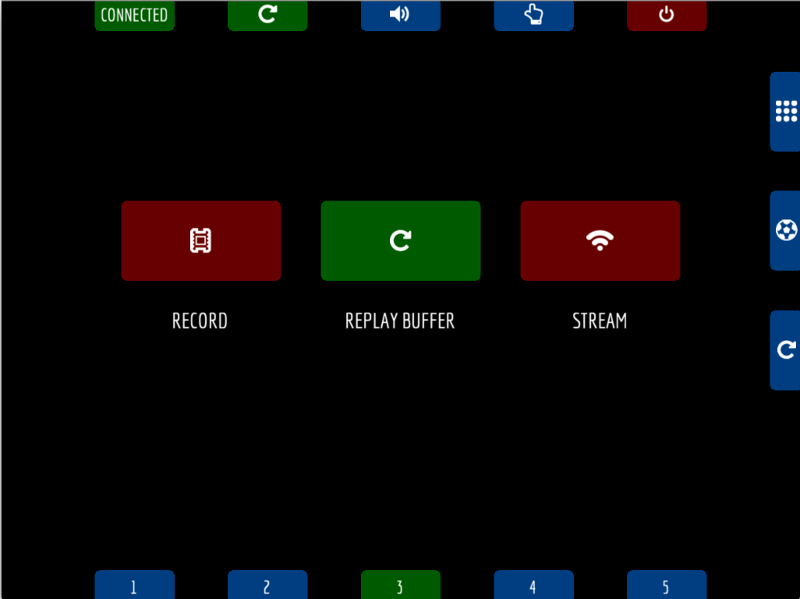
Starting and stopping your stream, recording and the replay buffer (for action replays) is done by pressing the buttons in the stream panel - accessed using the second button at the very top of the screen. The buttons are green when active and red when inactive. The panel button at the top of the screen also changes color and displays the icons of all of the currently active buttons so that you can see the current state at a glance.
The command to send a key stroke is key
The parameters are;
The optional delay specifies a time (in milliseconds) to wait before running the command.
The app parameter is used to find a window with a match in its title bar.
Example - send an F11 key stroke to Winamp on Windows.
|
Winamp send F11 key app=winamp data={F11} |
The data parameter is different for each platform!
Click here for more info on Windows key codes
| Character | Key data | Description |
|---|---|---|
| ~ | {~} | Send a tilde (~) |
| ! | {!} | Send an exclamation point (!) |
| ^ | {^} | Send a caret (^) |
| + | {+} | Send a plus sign (+) |
| Backspace | {BACKSPACE} or {BKSP} or {BS} | Send a Backspace keystroke |
| Break | {BREAK} | Send a Break keystroke |
| Caps Lock | {CAPSLOCK} | Press the Caps Lock Key |
| Clear | {CLEAR} | Clear the field |
| Delete | {DELETE} or {DEL} | Send a Delete keystroke |
| Insert | {INSERT} or {INS} | Send an Insert keystroke |
| Arrow keys | {LEFT} {RIGHT} {UP} {DOWN} | Send a Left/Right/Up/Down |
| End | {END} | Send an End keystroke |
| Enter | {ENTER} or ~ | Send an Enter keystroke |
| Escape | {ESCAPE} | Send an Esc keystroke |
| F1 ... F16 | {F1} ... {F16} | Send a Function keystroke |
| Help | {HELP} | Send a Help keystroke |
| Home | {HOME} | Send a Home keystroke |
|
Page Down Page Up |
{PGDN} {PGUP} |
Page Down Page Up |
| Numlock | {NUMLOCK} | Send a Num Lock keystroke |
| Scroll lock | {SCROLLLOCK} | Press the Scroll lock Key |
| Print Screen | {PRTSC} | Send a Print Screen keystroke |
| Modifier | Prefix with |
| SHIFT | + |
| CTRL | ^ |
| ALT | % |
|
Send F11 to winamp key app=winamp data={F11} |
| Modifier | Prefix with |
| SHIFT | s |
| CTRL | c |
| OPTION (ALT) | o |
| CMD | C |
|
Send keypress to OBS key app=OBS data=oC+j |
Using the xev command on Ubuntu (part of the x11-utils package), you can easily monitor and observe what the codes are for each key as you press it. The codes seem straight forward : including Return, Tab, F1, F2, F3..., Shift_L, Shift_R, Delete, Backspace, Up, Down, Left, Right, etc.
Up Deck uses xdotool to send the keystrokes on Linux - combination keystrokes are separated by + (plus sign).
To send a 5 keystroke, the key data would be 5
To send a % keystroke, the key data would be %
To send an F2 keystroke, the key data would be F2
To send an shift + Q keystroke, the key data would be Shift_L+Q (Left shift key)
Example - I set the Control + k hotkey in OBS to unmute a source
|
Send keypress to OBS key app=OBS data=ctrl+k |
There were a couple of requests specifically for animating the camera, so the attached video shows how to set it up step by step. Look out for the information on setting a scene item's bounding box type - it was missing from the docs and UP Deck requires this data to be set before it can resize an object! The video contains everything you need to know to animate objects by changing their position, size and rotation, so you can apply the techniques to any of your own scene items.
Adding to the previous video, another item is added to the scene and we switch the position and size of the two objects with an animated transition. You can use this idea to switch your camera and game video between full screen and minimized.
If you add a text source to your scene, you can use UP Deck to initialise it with a number, then use it as a counter or score board.
The command to update a text source counter is counter
The parameters are;
The optional delay specifies a time (in milliseconds) to wait before running the command.
Example - update a text source named Score1 - add 1 to the current value and display it as a two digit number.
|
Player 1 scores counter source=Score1 add=1 digits=2 |
To create a countdown timer, add a text source to your scene.
The command to create the timer is countdown
The parameters are;
The optional delay specifies a time (in milliseconds) to wait before running the command.
The timer is displayed as minutes and seconds - example : 12:04
The main programmable deck buttons are numbered from 1 to 500 and can be referenced by their number. You can also reference these additional deck buttons by using their name;
Example - create a timer and count down from 5 minutes (300 seconds). Deck button 22 is triggered when the countdown completes.
|
Set up a timer countdown source=Timer val=300 trigger=22 |
From version 2.1.17 of the Lua script, you can now use relative values to adjust a running countdown...
|
Add 5 seconds to timer countdown source=Timer val=(5) trigger=22 |
|
Subtract 5 seconds from timer countdown source=Timer val=(-5) trigger=22 |
The command to pause/ resume / toggle countdown timers is cdpause
The parameters are;
The val parameter can be 0 (resume), 1 (pause) or * (toggle current setting).
The optional delay specifies a time (in milliseconds) to wait before running the command.
Example - pause Timer1
|
Pause Timer 1
cdpause
val=1
Timer1
|
Example - resume Timer2
|
Resume Timer 2
cdpause
val=0
Timer2
|
Example - toggle the pause state of two timers
|
Toggle Timers
cdpause
val=*
Timer1
Timer2
|
You can update the text in any of the text sources in your scenes...
The command to update a text source is text
The parameters are;
The optional break parameter allows you to specify text that should be replaced with line breaks.
The optional delay specifies a time (in milliseconds) to wait before running the command.
Example - update a text source named MsgBoxText.
|
Set the source text text source=MsgBoxText text=Competition Time! |
Added in v2.1.19 of the Lua script, you can specify text to be used as a line break.
Example - update a text source with multiple lines of text
|
Update text with line breaks
text
source=TextData
break=<br>
text=Some test text<br><br>with<br>line breaks
|
From version 2.0, you can update any image source in your scenes...
The command to update an image source is image
The parameters are;
The optional delay specifies a time (in milliseconds) to wait before running the command.
Example - update an image source named PlayerImage.
|
Update source image image source=PlayerImage file=/Users/Judas/Pictures/Players/Player1.png |
From version 2.0.2, you can update media sources in your scenes...
The command to update a media source is media
The parameters are;
The optional delay specifies a time (in milliseconds) to wait before running the command.
Example - update an media source named Intro.
|
Update media source media source=Intro file=/Users/Judas/Videos/Stream/Intro.mp4 |
The following commands and aliases take a scene parameter as one of their arguments;
If you want to reference whatever the current scene is in OBS then you can use the special scene name _current instead of the actual scene name.
Example - show the object named Pointer in the current scene.
|
Show the pointer image show scene=_current val=1 Pointer |
The command to activate / deactivate a filter on a scene item is filter
The parameters are;
The scene, item and filter parameters are case sensistive, so must be typed exactly as they appear in OBS.
The group parameter must be used if the scene item is in a group (available from OBS Studio v22).
The optional delay specifies a time (in milliseconds) to wait before running the command.
Example - activate the xray filter on the Camera source.
|
Activate xray filter scene=_current item=Camera filter=xray active=1 |
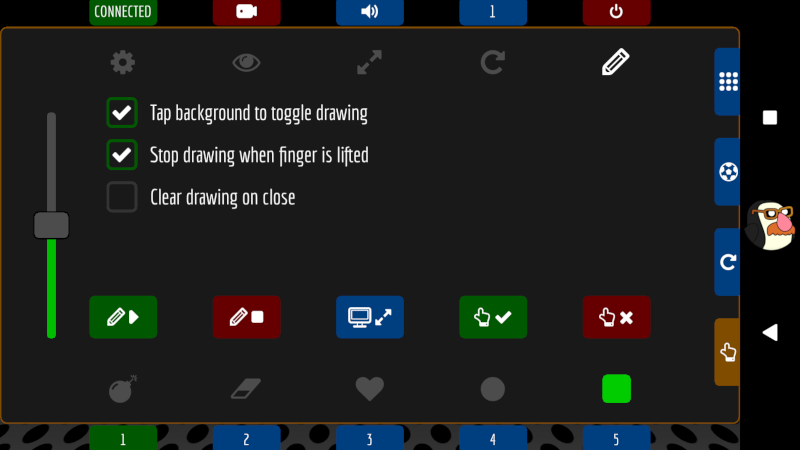
Telestrator (drawing live) is broken in the current version!
Dragpad gives you the ability to move objects around while you stream / record - as an example, you could have a pointer image to show viewers the exact location of the subject you are talking about. You can also draw live on screen. [ TO BE UPDATED ]
UP Deck lets you backup and restore decks to your device and desktop. If you have put a lot of effort into a large deck, it's best to backup to the device first, before wiping / starting a new deck.
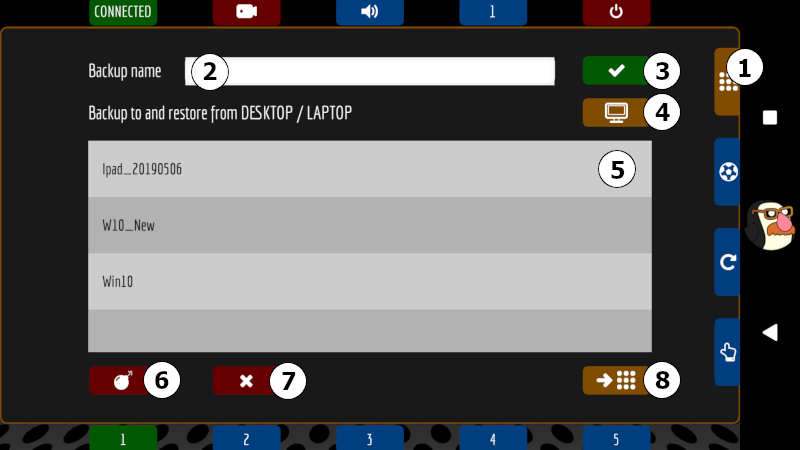
This functionality will change soon now that the desktop app has evolved!
You can now use OBS hotkeys to trigger the deck buttons. In OBS => Settings => Hotkeys, there are entries for the 100 deck buttons. Once defined, triggering a hotkey will simulate pressing the button on the deck. The only feature not supported at the moment is the toggle button feature : only the button's first state can be triggered, but I'll have a look at adding this extra function for a future update.

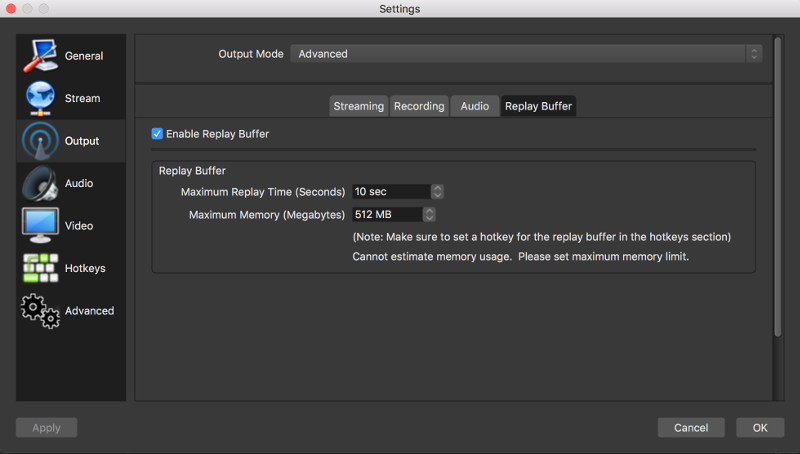
STEP 1
Set up the Replay Buffer - I'm recording 10 second clips.
OBS -> Settings -> Output -> Replay Buffer
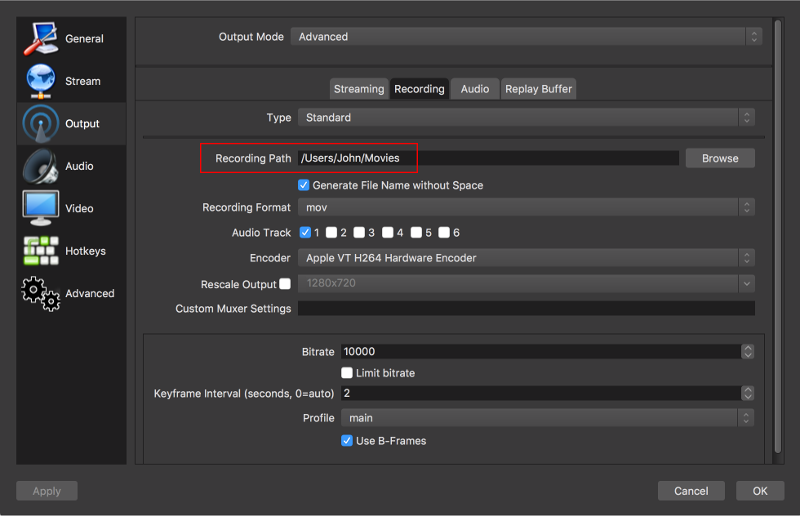
STEP 2
Take a note of the Recording Path setting in the Recording tab for step 4.
OBS -> Settings -> Output -> Recording
STEP 3
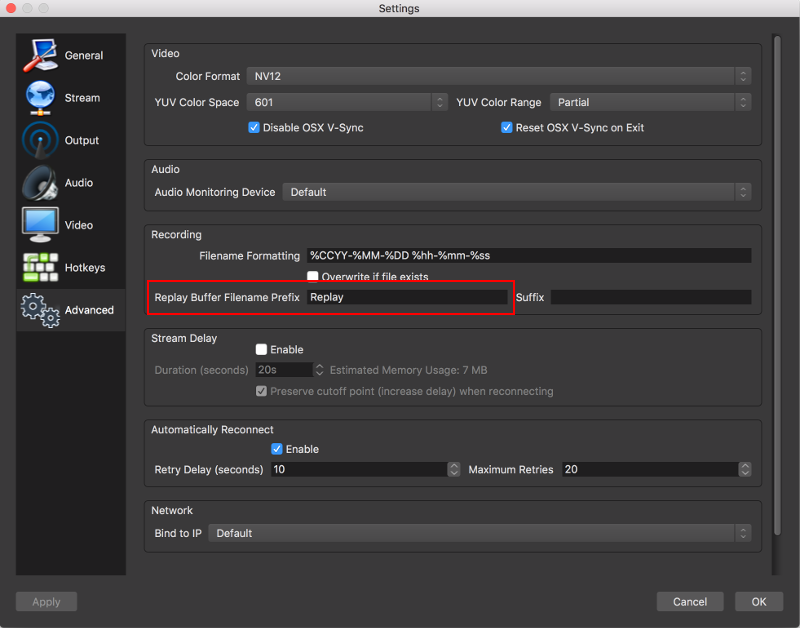
Set the replay buffer filename prefix to Replay
OBS -> Settings -> Advanced
STEP 4
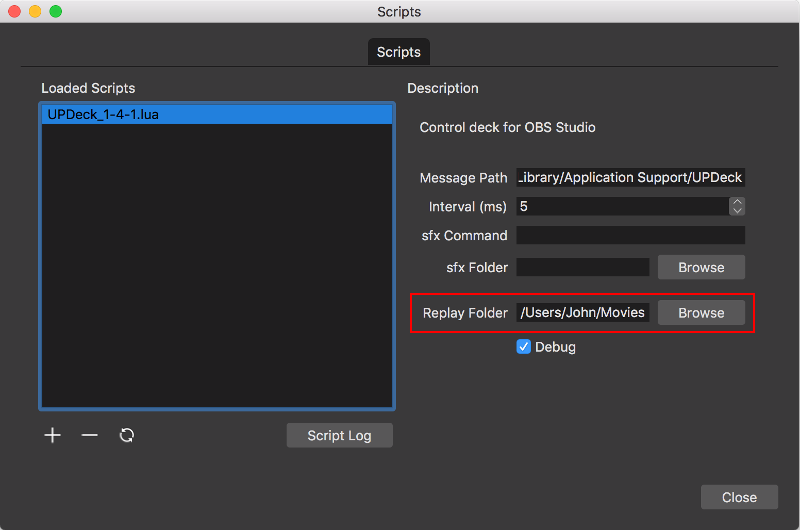
Set up the Replay Folder in the Lua script : the Recording Path setting from step 2.
OBS -> Tools -> Scripts -> UPDeck.....
STEP 5
Start the Replay Buffer. There's a new button in the streaming / recording panel to start and stop the replay buffer.
STEP 6
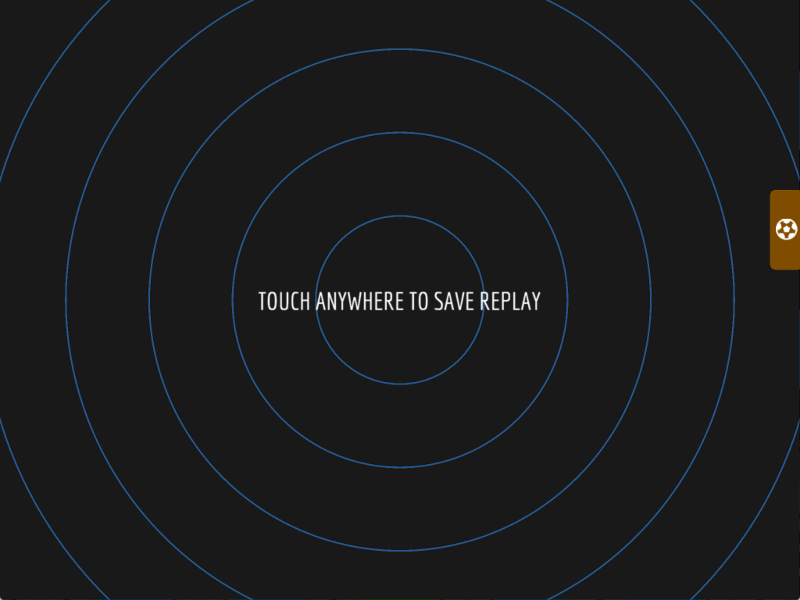
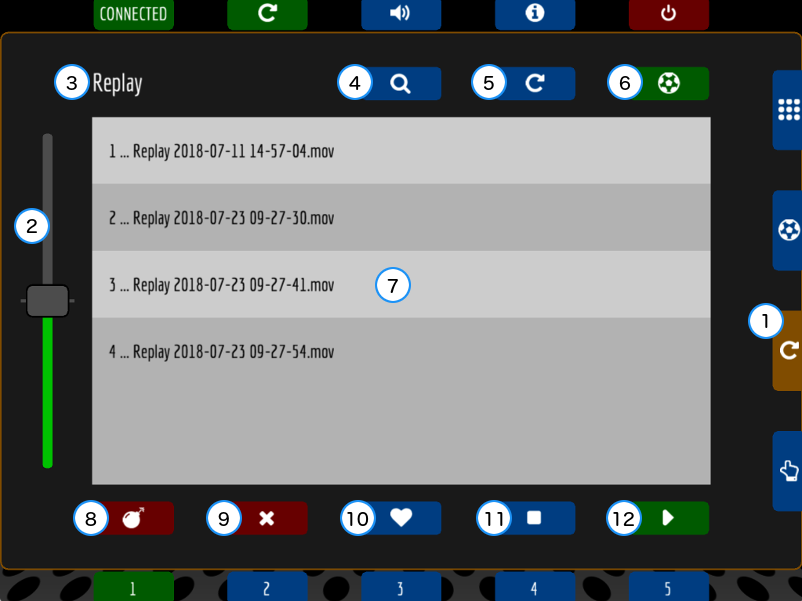
Use the Replay Save Panel to save action replays (button with a soccer ball icon). While playing a game, you won't get distracted looking for a small button to press - press anywhere on screen to take an action replay.
STEP 7
Create a media source called UP DECK REPLAY in the scene where you want to show your replays. You can then use the Action Replay Panel to view the saved replays.
I would love it if the speed control worked real time while a replay is playing, but it just sets the speed for future replays.
Buttons 11 & 12 - run commands before playing / stopping - why??
When testing the action replays, each time a clip was played, you could see the previous clip for a fraction of a second before the new replay was loaded. This didn't look great (looked glitchy), but I couldn't find a way to avoid it. Adding the configurable deck buttons provided the solution.....
I added two commands to run before playing a replay...
This solved the problem of the previous clip appearing for a short time.
Here are my custom actions to run before a replay starts;
Long press (press and hold) the green play button (button 12 in the screenshot above). This will take you to the button set up for custom actions before a replay starts. You can see I have two actions - one to hide the replay object, then one to show it again after a pause.
|
Hide the replay source show val=0 scene=_current UP DECK REPLAY
Show replay source after delay show delay=500 val=1 scene=_current UP DECK REPLAY |
Although the replay panel gives you easy access to replays, or files with any prefix you search for, you may want to program deck buttons manually.
The command to select a group of files based on their filename prefix is replays
The parameters are;
A list is created of the files with names beginning with the selected prefix (in alphabetical order). Each file can be referenced by its index number, beginning with 1.
The command to perform actions with the currently selected list of files is replay
The parameters are;
The save action does not need an index number, it just captures a replay - as long as the replay buffer is active. The index can also be the words 'first', 'last' or a negative number. Negative numbers count from the end of the list, so -1 is the last file, -2 is the second last file, etc.
The play and delete actions operate on the file selected by the index number.
Examples
|
Play the last file replay action=play index=last |
|
Save a new replay
replay
action=save
Refresh list of replays
replays
delay=750
files=Replay
Play the new replay
replay
delay=1000
action=play
index=last
|
The wipe action deletes all of the currently selected files!
There is an additional parameter for the play action which sets the object to use for playing files (defaut is 'UP DECK REPLAY');
When playing multiple movie files using the replay panel, you may notice the previous movie flashing on screen briefly before the selected file starts to play. Some extra deck buttons have been added to help solve this problem : the play, stop and custom (heart icon) buttons in the replay panel are configurable by a long press (press and hold). Any actions programmed in the play and stop buttons are performed BEFORE the main button function. As an example, you can program the play button to hide the replay object and then show it after a short delay : this solves the problem of the previous video flash on screen.
Up to now, you should have been using a media source as the replay object (UP DECK REPLAY). You can also use a VLC source. During testing, the VLC source audio went out of sync when playing a movie file, then selecting another file to play before the current file had finished. The media source audio always stayed in sync. However, the media source only lets you play one file at a time. If you want to play ALL of the current files as a playlist, then you may want to consider using the VLC source.
Use the play action with an index of 1 and an additional 'all' parameter to create and play the playlist using a VLC source;
This will play all the current files in sequence if you are using a VLC source.
* NOTES
If you want to simulate pressing the play, stop or custom buttons in the replay panel, the button id numbers are;
From v1.9.1, these three buttons also have names : they can be referenced by replayPlay, replayStop and replayCustom ;
button
The command to simulate pressing a deck button is button
The parameters are;
The optional delay specifies a time (in milliseconds) to wait before running the command.
The optional flick parameter allows to to update other buttons (like pressing them), but without running their commands. Useful for situations where you have multiple groups of related buttons and want to update the hilites in each group at the same time.
The main programmable deck buttons are numbered from 1 to 100 and can be referenced by their number. You can also reference these additional deck buttons by using their name;
Example - press the volume panel button after a 1 second delay.
|
Press button for volume panel button id=volume delay=1000 |
The command to ask for user input is input
The parameters are;
Each input name should be lowercase, begin with a letter and contain letters, numbers and the underscore character.
Each input type is either "text" or "number"
Examples;
After values have been entered, they are stored with the deck (and backups). Each value can be used when programming deck buttons by prefixing its name with '$'. The example below asks for a value 'countdown'. The value $countdown is then used to initialise a timer and button 22 is triggered when the countdown is complete.
|
Get start value for timer input countdown=number
Create the timer countdown source=Timer val=$countdown trigger=22 |
A new variant of the input command has been added in version 2.0...
Each input name should be lowercase, begin with a letter and contain letters, numbers and the underscore character.
Every time a *list parameter is ecountered, UP Deck will attempt to load the specified list from a text file and store it in the deck. If the file can't be loaded, the previously loaded version will be used if it exists. This allows you to load a file from one PC and then continue to use it when connected to other machines that don't have a copy.
Example;
UP Deck looks for a 'StarWars.txt' file in the lists folder. If you click the 'FILES' button on the desktop app, the application's folder is opened on the desktop. There should be a folder inside named 'Lists' - this is where you should save your text files.
The example StarWars.txt file contains the following;
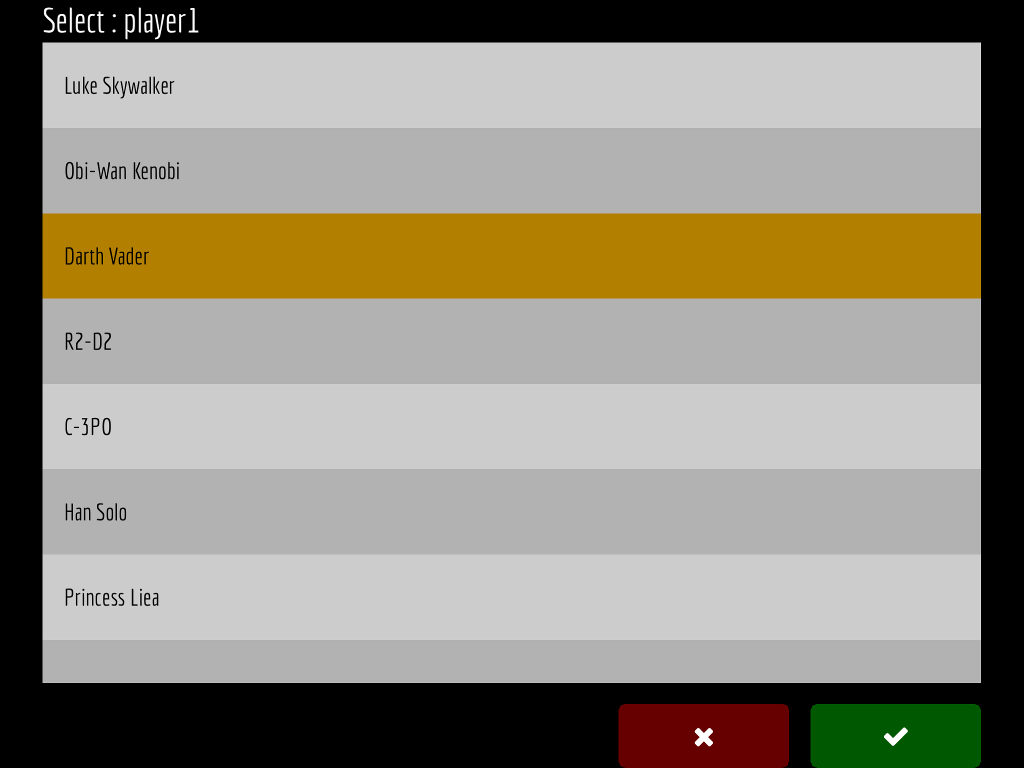
You can also create lists with values and labels : you pick from the list of option labels and the value for that option is returned. To set this up, create a list like the one below. Every line that has a value and a label should begin with a ':' (colon). The value comes after the colon, then another colon followed by the label.
|
Get characters from the list input *list=StartWars player1=list player2=list |
The command to set one or more custom variables in the deck (without asking the user) is setvar
The parameters are;
Each variable name should be lowercase, begin with a letter and contain letters, numbers and the underscore character.
Examples;
As with user input, values are stored with the deck (and backups). Variables can be used when programming deck buttons by prefixing the name with '$'.
Example - set the countdown variable, then use $countdown to initialise a timer.
|
Set the start value setvar countdown=300
Set up the timer countdown source=Timer value=$countdown trigger=22 |
The loop command allows you to repeat button actions a set number of times. Everything should work with the loop command except user inputs - which are dealt with before all other button actions. The command and parameters are;
loop
A special loop counter variable is created ( $@ ) which you can use in your commands.
The following commands were used for a wave effect. There are five boxes (color sources) at the bottom of the screen (Box1 ... Box5). The boxes are side by side, filling the width of the screen.
|
Create a loop for the 5 boxes loop start=1 end=5 step=1
Move boxes upwards animate delay=[$@ * 100] scene=_current item=Box$@ queue=1 y=(-20) steps=5 interval=5
Move boxes back down animate scene=_current item=Box$@ y=(20) steps=5 interval=5 |
To create the wave effect, each box has a slightly longer delay before it starts to move - using the loop couter variable $@ multiplied by 100 (millisecs). Note that the animation queue is enabled for each object so that any animation performed on it is finished before another begins. Also note the brackets around the change to the y position : indicating that the change is relative to its current position.
Since the animation queues are enabled, we can simply animate the box back to its original position - this animation will trigger when the previous animation is complete.
UP Deck tries to evaluate anything enclosed in square brackets. When a deck button is pressed, math expressions are evaluated before the actions are sent to OBS.
Example - if you have defined values $stream_width, $stream_height and $margin (see setting custom values), then you could position an object near the top right of the screen by using;
|
Place object near top right position scene=_current item=Icon x=[ $stream_width - $margin ] y=[ $margin ] |
As well as the standard math operators for addition, subtraction, multiplication and division (+, -. *, /), all of the functions listed in the Corona Math Library will also work.
Eample - update a text object with a random number between 5 and 10.
|
Update text source with random number text source=LuckyNumber text=[ random(5, 10) ] |
When used with loops, this functionality allows you to create some more complex animations without having to write a lot of individual button commands.
Live in v2.0 BROKEN IN CURRENT VERSION!
There were quite a few requests for drawing on screen during a live stream, so here's the first working version. Be warned - it's not fantastic - but hopefully it's useful! The original idea was to try to grab the current OBS view, get that image on the tablet, draw over the top, then transfer the drawing back across. After a few attempts, the results were too slow to be of any use. The compromise was to re-use the existing drag pad (that allows you to drag objects around the screen). By creating an object on your scene to overlay your content, we can now turn on drawing on the tablet and create some basic lines and shapes over the live stream. Even using this cut down idea, it's still fairly slow creating the updated image and then updating it on OBS.
Drawing with drag pad now creates an image named 'overlay.png' in the app's folder. The 'BACKUP' button has now been renamed to 'FILES' on the desktop app and clicking it opens the app folder. Add a new image source to your scene and set the 'Image File' property to the overlay image (and resize it to fill the screen). I also created a text object as a drawing alert, then used the setup buttons (accessed by presing the heart icon) to show and hide the alert when starting and stopping drawing. To start or stop drawing just tap the drag pad - after selecting an object to use as the pointer. If you need a pointer image, here's the one I used;

The third config button accessed by pressing the heart icon lets you input the width and height of your stream. This allows the drawing to match the position of the pointer on screen - the defaults are 1280 x 720.
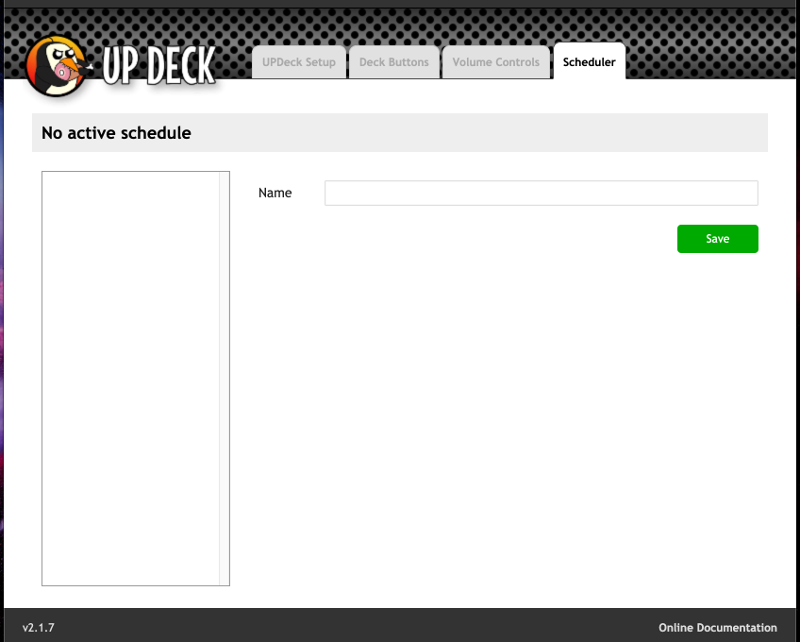
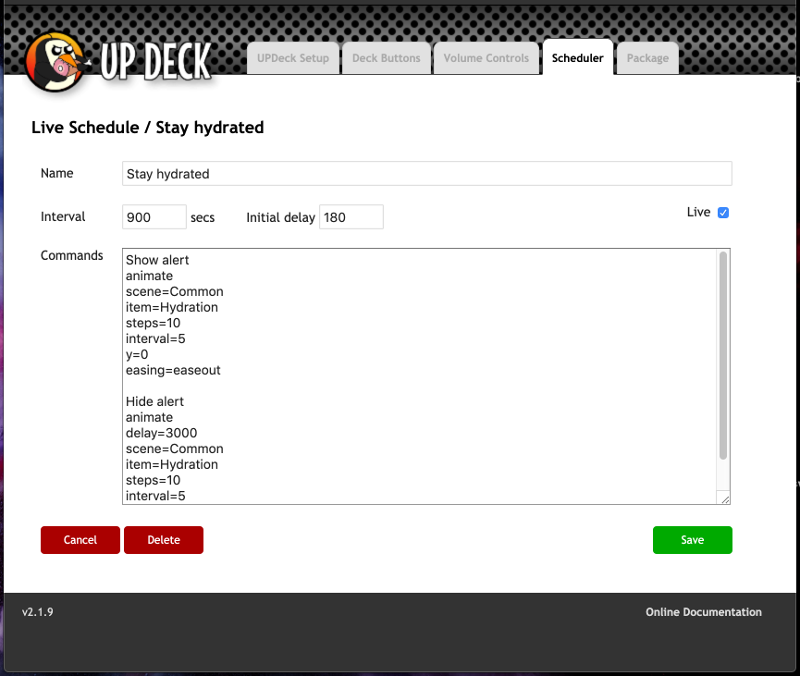
The scheduler allows you to set up reminders or repetitive tasks such as remininding you to stay hydrated or showing a sponsors ad every so often. To get started, just enter a name for the schedule (alphanumeric and spaces only) then click 'Save'
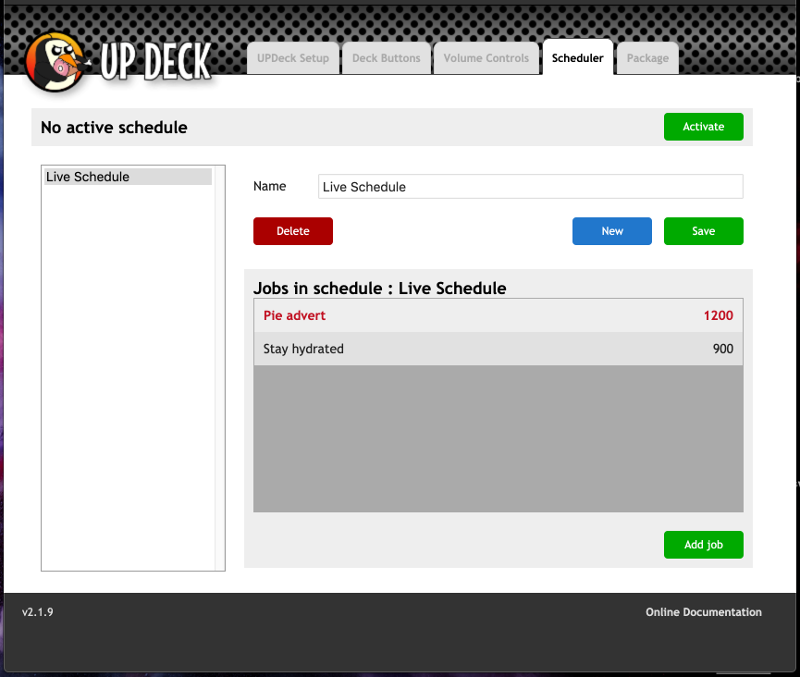
You can set up multiple schedules, but only have one running at a time. Now that you have a schedule, you can add jobs to it with the 'Add job' button.
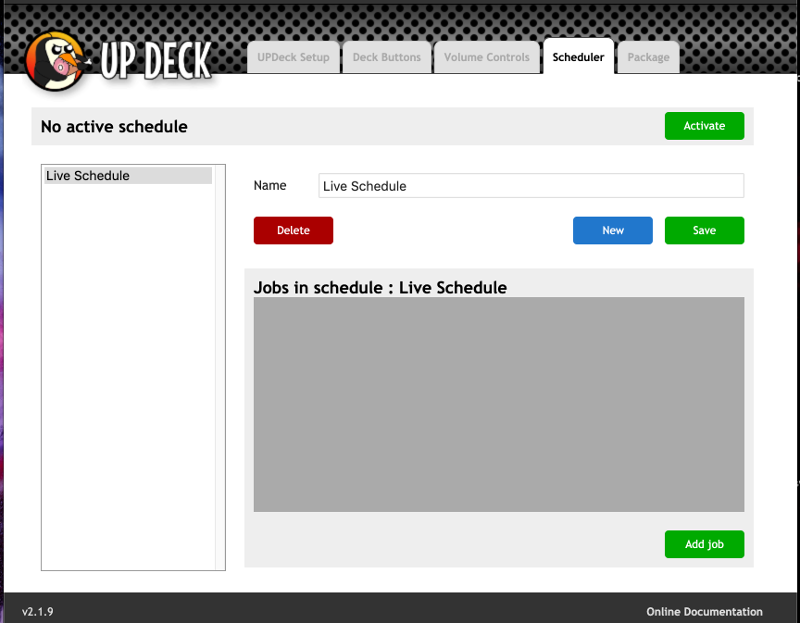
In the example below, I've set up a job to run every 15 minutes (900 seconds). The initial delay is how long to wait before the job runs for the first time - 3 minutes in this case (180 seconds). You could also set up a job to run just once by setting a huge interval (like '99999') and set the initial delay to how far into your stream you want it to run. Use the 'live' checkbox to make the job active or inactive and enter the commands to run in the normal way. I've set a notice to animate on screen then move off screen after a 3 second delay.
Active jobs are shown in green and inactive jobs in red. To start the selected schedule, click the 'Activate' button.
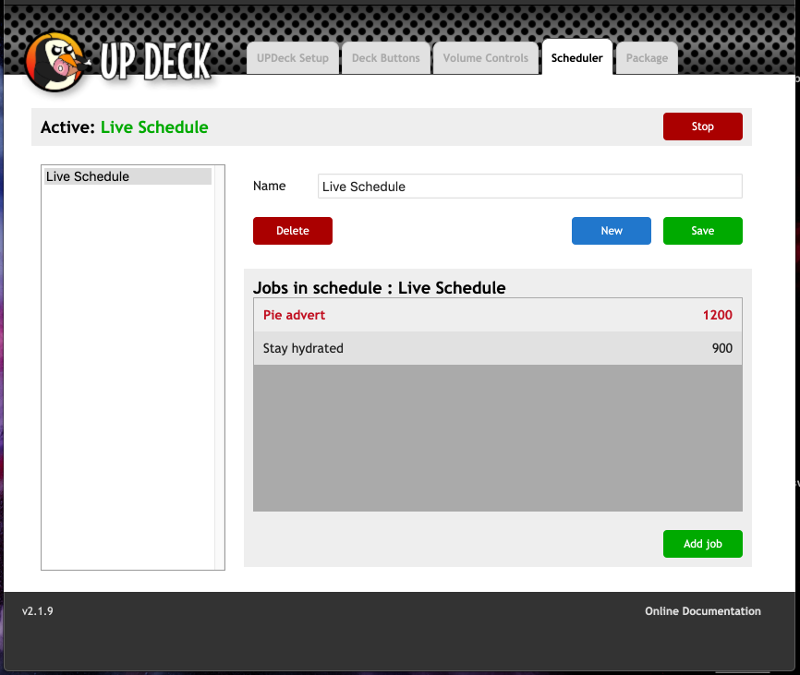
Once a schedule is running, the active jobs run at their set intervals. To stop the schedule just click the 'Stop' button.
The command to start a schedule or stop the active schedule is schedule.
Example - start the schedule named 'Live Schedule'
|
Start the scheduler schedule start=Live Schedule |
Example - stop the active schedule
|
Stop the scheduler schedule stop |
If you have deck hardware (like the streamdeck) or are using another deck app (check out https://obsproject.com/forum/resources/ for other options), but you still want to use some UP Deck features then you can use the UP Deck desktop app with your deck of choice...
First read Assigning_actions_to_buttons - then set up a deck and buttons to perform the required actions. You can then remotely push the buttons by calling the 'xdeck' url - just program your deck app or hardware to access a web page.
Example - press button 10 in the deck named 'streamdeck'. (You can test by entering the url into your browser)
http://127.0.0.1:10314/xdeck/streamdeck/10
Note : your deck software / hardware must be running on the same machine as the UP Deck desktop app.
WARNING - Scripted transitions are a new feature. Don't use in a live situation unless you have tested them and are confident they will behave!
V2.1.12 : Lua script and transition scripts have been updated - click 'Files' in the UPDeck setup screen then delete the existing Transitions folder. When UPDeck is restarted, the Transitions folder will be recreated with the new transition files. This version behaved perfectly for me on the Ryzen PC and was much more stable on the Mac, however, I did manage to freeze OBS a couple of times on the Macbook so I'm going to have another look at getting it 100%.
V2.1.11 : The transitions were initially tested on an AMD Ryzen 2700x PC and all worked OK. When testing on a 2015 Macbook Pro, the curtain transitions crashed OBS : the Macbook was running much slower and needed more time to complete the transition. A quick script edit fixed the problem on the slower machine. Future updates will try to automatically compensate for different hardware, but it's easy to tweak the scripts if you have to - see below for details...
The command to switch to another scene using a scripted transition is scriptswitch
The parameters are;
The transition parameter is one of the files from the Transitions folder (without the .lua file extension) - click the Files button on the UPDeck setup page to open the main folder that contains this folder. More transition files can be saved here to give more effects, but at the moment, the choices are;
The optional delay specifies a time (in milliseconds) to wait before running the command.
Example
|
Switch to Game scene scriptswitch scene=Game trans=rect_melt_right |
V2.1.11 only - tweaking the transition script : each transition file ends with a block of code like the one below. You just have to alter the number shown in red - it's the number of seconds to wait before the transition is considered complete. If you run a transition and you see that OBS cuts to the target scene before the animation finishes (OBS may also crash!), then add some extra time - maybe try 5000, etc...
|
obs.timer_add(
function()
obs.obs_frontend_set_current_scene(sceneSource)
obs.script_log(obs.LOG_INFO, "Transition ready to animate")
local cmd = ""
for i = 1, 32 do
cmd = cmd..format(
"animatetdelay=%dtscene=%stitem=%stgroup=%ststeps=50tinterval=10tr=(-90)tw=0th=0n",
40 * i, sceneName, "UPD_TRANS_OBJ_"..i, groupName
)
end
listen(cmd)
obs.timer_add(
function()
local targetScene = obs.obs_get_source_by_name(sceneNameB)
if targetScene then
obs.obs_frontend_set_current_scene(targetScene)
obs.obs_source_release(targetScene)
end
scrSwitch.busy = false
obs.script_log(obs.LOG_INFO, "Transition complete")
obs.remove_current_callback()
end,
3000
)
releaseAll("animating")
obs.remove_current_callback()
end,
200
)
|
You can fetch some properties of scene items with the fetchprops command. The properties are saved in the deck variables that you specify.
The parameters are;
The scene, item and group parameters are case sensistive, so must be exactly as they appear in OBS.
The group parameter must be used if the scene item is in a group (available from OBS Studio v22).
The optional delay specifies a time (in milliseconds) to wait before running the command.
For more info on bounds : Bounding_Box_Type
Example - fetch the x and y co-ordinates of the Message item and put the values in $message_x and $message_y
|
Fetch message position fetchprops scene=Studio item=Message x=message_x y=message_y |
Note : no $ before the variable names for fetchprops (they are just the names to assign the values to).
Gotchas
Due to fetchprops having to request and receive values from the desktop app (which takes time), those values are not immediately available, so the following commands would NOT work as expected;
|
Get current message fetchprops scene=Studio item=Message text=message_text
Put message in featured field text source=Featured text=$message_text |
The variables in the commands are substituted and processed before the requested values are received, so the $message_text in the second command is substituted before the first command receives the current value from OBS! There are a couple of ways to work around this.
1. Put the first command in a button and then call another button containing the second command.....
First button (example : button 29);
|
Get current message fetchprops scene=Studio item=Message text=message_text
Update featured field button id=30 |
Second button (button 30);
|
Put message in featured field text source=Featured text=$message_text |
2. Create a toggle button - same method, but put the commands above into the two states of the button and let the button press itself.....
First button state (example : button 29 - note the button presses itself);
|
Get current message fetchprops scene=Studio item=Message text=$message_text
Press this button again id=29 |
Second button state;
|
Put message in featured field text source=Featured text=$message_text |
Both button states are processed and the button is reset to its orignal state.
You may want to update mobile deck button labels at some point - maybe to reflect a current score, etc. The setbutton command allows the labels to be updated (and may have more capabilites in the future).
Example
|
update score setvar $score=[ $score + 5 ]
update label setbutton id=74 text=$score |